Thursday, February 21, 2013

Fairy Houses by Tracy Kane

DSC_4715
Photo of a fairy house built by one of Tracy Kane's fans
(Originally from the fairy houses website)
 
This is already a big movement apparently, but it's new to me. I just discovered the book Fairy Houses by Tracy Kane at my local library, and I'm so excited about it! Here is the companion website where you can see houses made by fans, gatherings and events, and so on:
http://www.fairyhouses.com/

As soon as I started reading this book to my son, I couldn't wait to build my own fairy house! Then I started thinking about how I could scaffold this idea down to a level that pre-schoolers could handle.

I can't wait to do a pre-school version of this activity with my Mom's Club!

Wednesday, February 20, 2013

Pre-school Lesson Plan / At Home Activity for Toddlers: St. Patrick's Day Shamrocks

Sub-title: A lesson about color mixing and symmetry.
 
This lesson could use a variety of shapes for a variety of different holidays, times of year, or other occasions. In fact, this was initially supposed to be a Valentine's Day project using hearts. When it got bumped to the week after the holiday it became a St. Patrick's Day project using Shamrocks. I also saw the opportunity to put a greater emphasis on mixing colors than the heart project would have given. Another common spin on this project is a butterfly shape.
 
Materials:
White construction paper or craft paper
Pencil
Scissors
Tempera paints, Yellow and Blue
Brushes or paint sponges
 
Prep:
1. Put several sheets of paper together and fold them in half vertically.
2. Use the fold as your line of symmetry, and draw one half of a shamrock or 4-leaf clover design onto the page. I googled images of shamrocks and clovers as references to help me make recognizable basic shamrock and clover shapes. Just keep them simple and sturdy for young hands.
3. Cut out your design, so that when you unfold the page it makes a symmetrical shamrock or clover.
4. Repeat until you have enough blank shamrocks and/or clovers for your group. Remember to stack your paper so you get several shapes out of each cutting session.
5. Set up your painting materials - a vinyl tablecloth to cover your work area, plastic take out containers and lids make good paint palettes. You may or may not want to set out water cups for dipping paint brushes, depending on your kids and how likely they are to spill them!


Activity Plan:

1. Introduction: I'll be doing this project with a group of toddlers and pre-school kids for my local Mom's club. In an attempt to keep things organized I'll use the following "signs".


We'll read the sign on the left first, to discourage a mad dash for the supplies! I also like to do the intro as far from the supplies as possible, usually seated on the floor, away from the work tables.

Then I'll read the letter on the right. I learned the "letter" style intro from my student teaching mentor, Laura Gibson. She is an excellent elementary art teacher!
Then I'll show the kids the supplies, saying:
Me: "Uh oh, what color are these clovers?".
Kids: "White!"
Me: "What color are shamrocks and clovers supposed to be?"
Kids: "Green!" (Or maybe they won't know! We'll see!)
Me: "Well we can paint them! But wait, I don't have any green paint! Does anyone know what two colors we can mix to make green?"
Answer, supplied by the kids or me - Blue and Yellow!
2. Demonstration: Still in the introduction area, demonstrate using the sponges to apply the yellow and blue paint, dabbing and mixing them on the white shamrock paper. Keep the paint on one side of the fold only. Then fold the shape in half so that the paint makes a print on the other half of the paper, a symmetrical design.
Point out things that one does NOT do with the paint, such as paint oneself, the floor, etc.
3. Have the kids go to the work area and begin to paint. Remind them to keep their designs on one side of the fold, then help them fold the paper to make a symmetrically printed design. Keeping the paint on one side only may be too difficult for many toddlers, but that's ok. They can still fold the paper (with help) to make a symmetrical design.
4. Clean up!
- Have kids put sponges and brushes in a clean up bucket.
- I like to use wipes for clean up with toddlers and preschoolers. It allows them to help too.

Total Time for Activity with Introduction: Aprox. 20 minutes

Note for parents: Toddlers will usually paint for only about 5 to 15 minutes at a time. It can be a lot of set-up and clean-up work for such a short attention span, but try not to get frustrated. It helps when you know what to expect, and that it is perfectly normal! This is also one of the reasons I like to do activities with groups of friends - more parents to help with set-up and clean-up, and it feels like it's "worth it" when more kids get to participate.

Extensions:

You can use these ideas to keep kids' attention on the activity a little longer, especially if you are a teacher using this lesson for a class period that is longer than say, 30 minutes.

1. Multiple shamrocks for each kid. Done already? Have another!

2. How much of the paper can you cover with paint?

3. Can you make designs with white (negative) space and the paint?

4. Use the wrong end of a brush to scraffitto into thick paint.

5. Paint on different colored construction paper

6. Use shaped sponges to make prints

7. Add more colors and try mixing those.

Note: A lot of kids will want paper after paper to paint on, each for about 60 seconds. To slow them down a bit, before they run through all the paper in the room, suggest they add to each one before calling it "done". I like to say, "That's great! Now try adding __________ (scraffitto, a sponge printed shape, more paint, designs and patterns of marks, etc.)!"

 
Examples of work: These are from doing the activity with my Mom's club...

Participants were 1.5 to 5.5 years in age. Moms helped a lot with managing materials and clean-up, but didn't neat to assist too much with the painting, with the exception of the under 2 set.


Tuesday, February 19, 2013

Lesson Plan / Process of a Project: Building a Portrait Bust... in this case of a Mouse

Project: "Small god #1: Mouse Girl" 
(Alternate title ideas... Minimus deus?)
 
This post follows my process in building a ceramic portrait bust, which happens to be of an anthropromorphized mouse. In documenting the process, I hope that it can be used as a guide for students on how to develop a project from sketch stage to completion, as well as a specific reference for building a portrait bust using the coil method.
All photography is by me, as I worked, so getting shots of my hands employing techniques was not possible. Still, I hope this is useful.
 
Step I. Sketch: In this case my idea was to come up with characters, of which I plan to make small figurines, as well as larger (tabletop size) ceramic sculptures. Here are my original sketches for this character.
 
 
Step II. Research, then sketch some more: There was a lot I didn't know about mouse anatomy. I also, had to come up with a solution for making a tabletop ceramic piece that could stand on its own. I settled on the idea of a portrait bust.
 
Here are some of the reference photos I used for mouse anatomy, the sketches I made from them, and my final sketch for the ceramic bust.


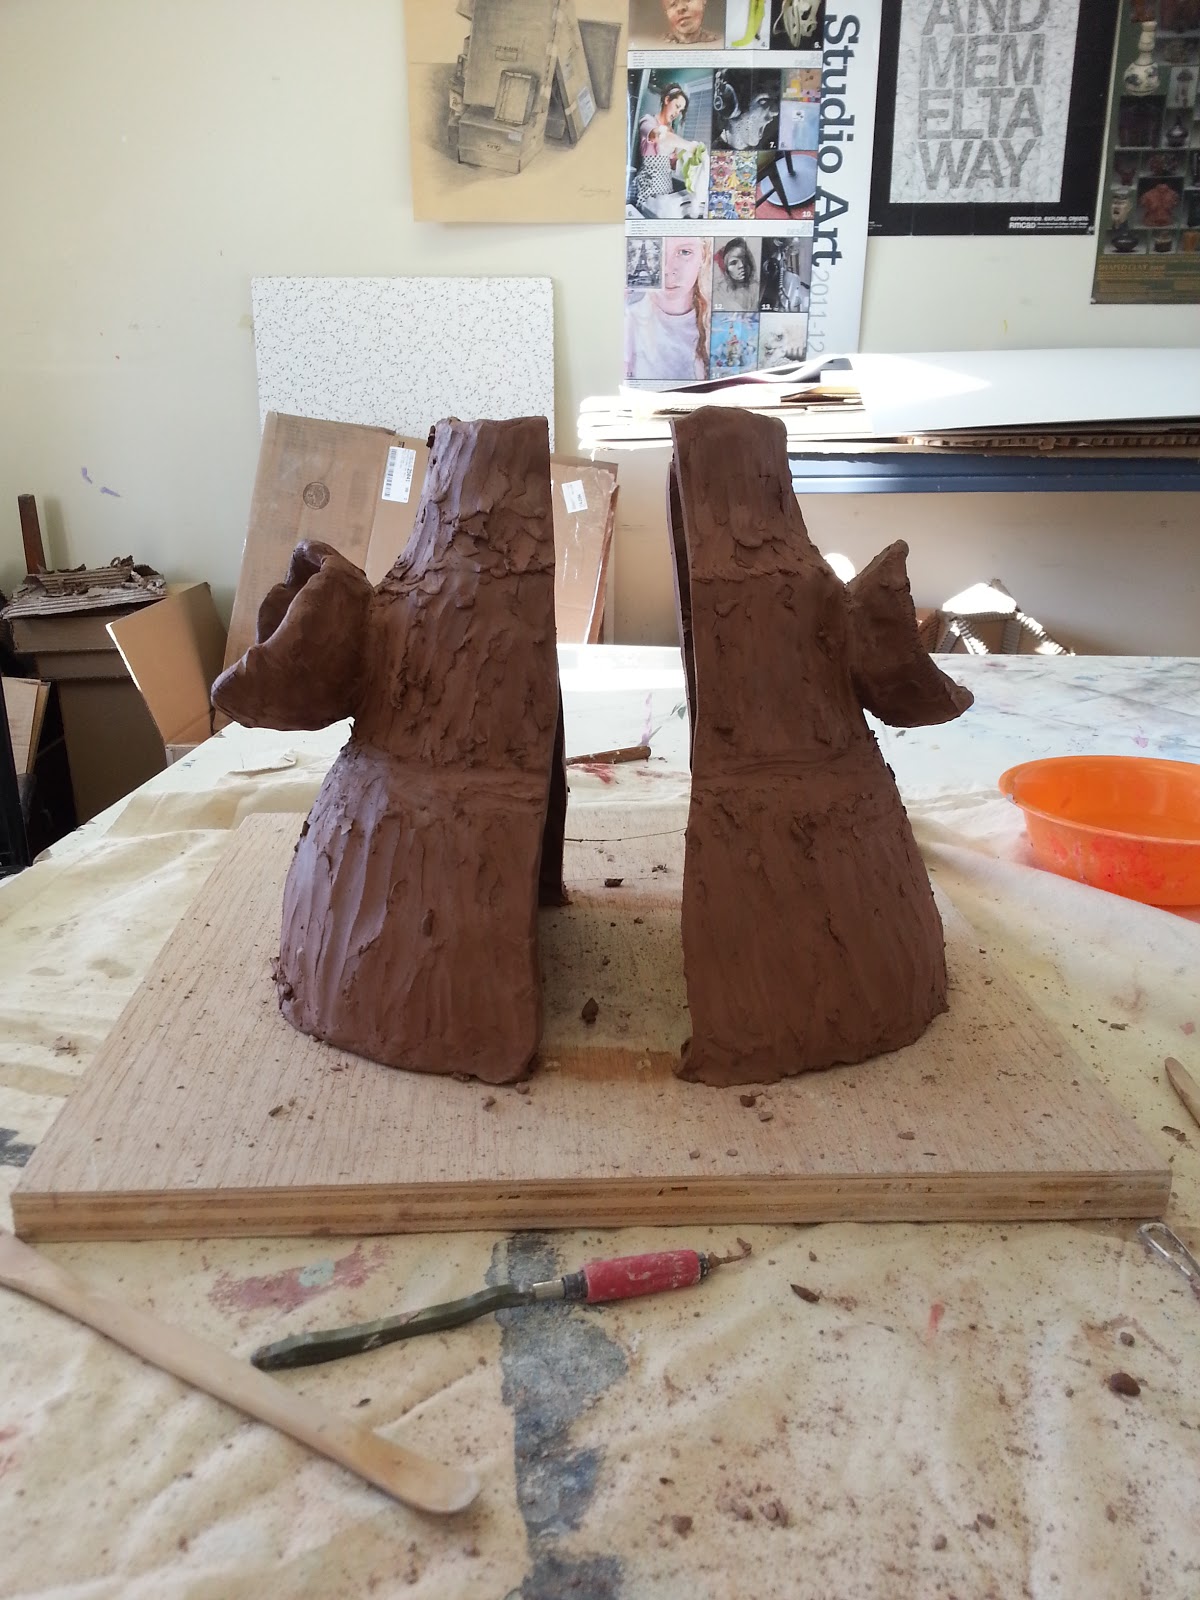
 Step III: Start building the basic form of the bust, using the coil method.
 
 
The line down the center of this form is illustrating the "clay surgery" documented below. When you begin building, you won't have such a split or line.
 
Tips for students:
1. Keep your tools, extra clay, and sketchbook nearby.
2. Keep your extra clay in a plastic bag to keep it moist. Your clay should be firm but flexible. If it starts to crack when you bend it, add water. If it's gooey or collapsing, let it dry out a bit.
 
 
See how my extra clay is kept inside a plastic bag so it doesn't dry. I also have a bowl of water and a spray bottle handy to rewet it.

 Troubleshooting: Students often have problems with handbuilt pieces becoming too thick and heavy. You need a certain amount of thickness while building in order for the clay walls to support themselves, but if they are too thick you are more likely to run into trouble with air bubbles in the kiln.
 
Solution: "Clay Surgery"
(You can also use this "surgery" if your piece is simply too big.)
 
Clay Surgery, Step 1. Cut sculpture in half with a wire tool. This process is best started when the piece is still rough and without detail.

 
Clay Surgery, Step 2. Use a tool to scrape excess clay from the inside of the sculpture's walls. Pay special attention to places where the clay is thickest. Your goal is a uniformity wall width.

A cross section of my sculpture, along with a ball of clay that has been removed from it.
Clay Surgery, Step 3. Rejoin the two halves of your sculpture. Make sure to score, splip, and then patch with a bit of extra clay on the surface of the opening.

 
Step IV. Continue building the rough shape of your piece. When you add large surface details or forms that adjoin to the body, like the arms on this piece, make them hollow, and creat a hole in the wall that they attach to, which opens into the large hollow center of the piece. This way, no part of your sculpture will be too thick, and no part will trap a large air bubble.


Troubleshooting: Another common problem is for the sculpture to get too wide, or fail to narrow when the sculptor wants it to.
Tips:
1. Build it narrower than you want it to be.
2. Curl the top edge in as you work (see the photo above).
3. Use a hand or finger to support the clay from the outside as you add each coil.
4. If your form has already gotten too wide, perform "clay surgery" (again).

In this photo, part of my sculpture has become too wide. I have built the back of the skull out too much, more like a human (my usual subjects) than a mouse. So I am performing "clay surgery" to bring it back in and achieve the form I want.
2nd Clay Surgery, Step 1: Trace the outline of the piece you want to cut out, usually a V shape. In this case I just need one. Often you need two on either side of a symmetrical form. You may need more than two, just keep in mind that they need to be centered, or at opposite points, in order to maintain the symmetry of a form.
 
2nd Clay Surgery, Step 2: Cut

2nd Clay Surgery, Step 3: Bring the edges of the clay together, score, slip, and patch to repair. You may need to continue to adjust the sculpture until you get the form you desire.

For smaller changes, you can push the clay out from the inside of the form, or pinch it in from the
outside.

Step V: Continue to build up the basic form of your sculpture, finally enclosing the top of the head.

Step VI: Add details.
Most details will be added by adding onto the outside of the form, as show below.

Tip: You can also make subtle adjustments by pushing, pulling, and pinching the clay. Many adjustments are best made from the inside out, so you will either want to make them before you close up your piece, or at a point when it may be cut open during clay surgery. Don't be afraid of making BIG changes to your work in progress!

Tip: DON'T BE AFRAID while making art, in general! I used to waste a lot of time hemming and hawing over every little descision. As I have gotten older and have gained experience I realize it makes much more sense to just pick a direction and go for it. Even if you make a mistake, you end up saving so much time that you have plenty of time to fix it. Or even better, you can start fresh and make a second work, in which you go a different direction. That is how series are born. Most professional artists work in series, in which they can explore several directions for one central idea.

When adding symmetrical details, like ears, build both up at once, rather than completing one and then the other. This will allow you to see differences, and correct them, as you go.

Tip: On the other hand, you may not want a PERFECTLY symmetrical sculpture. In nature, things are rarely perfect. Small "flaws" in symmetry, whill make your sculpture look more natural, more like a real person, or in this case, mouse.


Adding the brow bone. These start as coils, but will be smoothed in on the edges to create a more subtle effect. In places, more clay will be built onto the surface of the face, in others, the form may be pressed in, or carved away.

For the eyeballs, I form a clay ball, then cut it in half. Each half sphere will be scored, slipped, and attached to the proper place on the face. See below.

The brow bone is still rather severe here. I will add a bit more clay to the surface of the center forehead to achieve the desired effect. I will also add coils for the upper and lower lids on the eyes. A nose  and dimples where the whiskers protrude are also forthcoming, etc.

 
Step VII. Continue to add details, using slipping and scoring to attach coils, slabs, etc.
 
Step VIII. Texture.
Create different textures where appropriate. In this case I carved out a "furry" or "hairy" texture for the mouse's body. For the dress I wanted a smoother look, which I achieved with my finger, a damp sponge, and various tools to scrape and polish. I worked on the textures in many short sessions, in stages if you will.
 
Tip: Don't rush texture. I like to do the final touches in many small steps as the sculpture slowly reaches different levels of dryness. This is especially effective for achieving a smooth texture.


Final Tip: It's never too late to make a big change! Ok, that's not true. With clay, there is a point of no return. But you can still make big changes at the leather hard stage. After an informal critique with a fellow artist, I added a tail snaking up the back of this piece, my friend's suggestion. My first reaction was, "No, it's too dry. It's too far along. I've made enough major changes." I was scared. But I remembered my own advice not to be afraid, and decided to go for it. Thanks for the idea, Jean! (pictures are coming)


Another big change, made after most of the photos taken here: I decided the neck was too long, so I cut the whole head off with a wire tool and removed about an inch of clay in height, then reattached the head. Don't be afraid!

Thursday, February 14, 2013

Lesson Plan (from the Archives): Fairytale Mixed Media Painting, High School


Mixed Media Assignment


Problem: You will create a collage using found images which illustrates a traditional story, such as a myth, legend, or fairy tale. You will then use this collage as the basis for a painting or mixed media piece.


Part I: Collage using existing images


Step 1: Brainstorm stories in which you are interested. Think about the visual possibilities of each tale. Choose one.


Step 2: Collect images from magazines. You may also look up and print some images, however, avoid using pre-existing illustrations of your tale as much as possible. Your finished collage will be more interesting if you push yourself to use originally unrelated images in a creative manner.


Step 3: Paste your images to a heavy paper to form your collage. Think ahead of time about images that should overlap.


DUE TUESDAY – one week from today


Part II: Mixed media piece using your collage as a basis


Step 1: A ground – choose one or more general colors to paint the entire surface of your paper


Step 2: Underpainting – paint the basic shapes of the images you see in your collage


Step 3: Adding details – you can continue using paint, or use markers and pens as well


Step 4: Collage items – cut images out of paper, or find pre-existing images. You can also add more unusual materials such as fabric.


DUE: End of marking period

Cinderella: Collage from pre-existing found images.

Cinderella: Pencil drawing done from the above collage.
 
These two Cinderella illustrations take an early, Grimms Brothers, version of the tale for inspiration, which differs significantly from the Disney movie. The grave of Cinderella's mother, and the tree that grows on it, figure prominently in the older story. The tree itself replaces Disney's fairy godmother, with Cinderella's gown falling from it's branches. The birds are Cinderella's other helpers and saviors.
 

Thoughts while working in the studio this morning...

Morning of February 4th, while working in the studio...

On craftsmanship: I am not terribly interested in perfection, in a physical sense, because the physically perfect has become commonplace. We are surrounded by mass-produced objects, each identical, each perfect. We are also surrounded by images of perfect bodies in the media, which have usually become that way by artifice - surgical or digital - and which too have become almost identical in their perfection. I am more interested in the flawed and handmade, in the wabi-sabi aesthetic, and most of all, in the ideas behind the physical form. The quest for perfection bores me. Experimentation with new forms, ideas, and materials fascinates me, but leaves little time for perfection.

Why do we fall in love with the people we do?
Often times we see in them, or seek in them, what we are lacking. My friend S is quite the showman, but often times his showmanship is at least partially constructed of bullshit. He chose for a partner a woman who is exceptionally intelligent, but also exceptionally quiet and reserved, the opposite of himself. She does not put on any show, but suddenly may reveal a depth of understanding previously hidden. As for myself, I am kind but often oblivious, my husband is very aware of others, but does not always choose to be kind. And yet there must also be some common ground. We both value loyalty, honesty, intelligence, and a good story.

All in all getting up, eating breakfast, then going to the studio for two hours was not a bad way to start the day. While it was a bit rough getting going, it put me in a good mood for the rest of the day. I'll have to make this a weekend morning routine. (Today was like a weekend because Jacob had off from work.)
Work in Progrress: Cardboard armature for "dollhouse/gameboard" piece. Aprox. 24" high.

Lesson Plan (From the Archives): Australian Aboriginal Inspired Painting, Middle School Level


Australian Aboriginal Painting

5th & 6th


Goals: Create a painting inspired by Australian Aboriginal paintings, which will tie in with the class’s social studies unit on Australia.


Skills:

-          Acrylic painting

-          Analyzing and imitating a style

-          Stylizing organic forms from an existing image


Materials:

-          Sketch paper

-          Heavier white paper for the final piece – I like to use left over Railroad board from matting

-          Pencil and eraser

-          Acrylic paint

-          Smocks

-          Brushes – including small ones

-          Water cups

-          Newspaper to cover tables


Prep:

- Cut paper to size

- Find photos of Australian animals for reference


Intro:

  1. Look at examples of paintings by Aboriginal people. You may want to choose examples that specifically reflect the type of assignment you want the kids to do. Or you may want to choose a variety of paintings.
  2. Analyze what makes these works unique. Talk about specific shapes, patterns, and other characteristics. You may want to use a worksheet or another structured activity.

Steps:

  1. Choose an animal to draw, one that is native to Australia. Get a photo of it to use as reference.
  2. Draw a thumbnail sketch. Start by drawing a square or rectangle that is about the same proportions as your final paper will be.
  3. Include your animal and some sort of border in your thumbnail sketch. You can also divide your space into more than one frame and use multiple borders.
  4. Your  animal must fill the space inside the border, by touching at least 3 sides.
  5. Make your animal stylized by using simple shapes, rather than trying to make it exactly realistic.
  6. Once you are happy with your thumbnail sketch, get your final sheet of paper (a heavier paper) and draw your image onto here, full size. You don’t have to draw every detail and dot, however.
  7. Talk about paint colors with the kids. You may want to limit their palettes to more traditional colors – such as ocher, black, and white – or to primary colors.
  8. Have the kids get one or two colors of paint at a time – in small dabs on their palette.
  9. Use paintbrushes in at least two sizes – one for larger spaces, another for smaller details.
  10. Start by painting the large areas. You may need to use two or more coats.
  11. Show the kids how to add a bit of water to their brush in order to get a smoother edge, rather than a dry-brush “fuzzy” edge.
  12. Once the large areas are covered, add details (such as patterns, lines, dots, etc.) on top of and around them.
  13. Continue painting until finished. You may have to encourage the kids to fill more spaces with pattern than they do at first, or to add more detail to their piece.
  14. Kids can also add details with sharpie marker after the paint is dry.
Resources: